Showing posts with label Value Village. Show all posts

Wednesday, May 13, 2015

COUNTRY VILLAGE QUILT-A-LONG, PART 3: Piecing the blocks.

Hi peeps! 


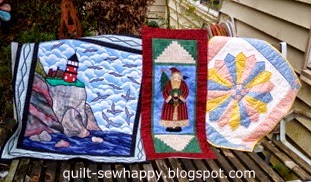
WARNING: PICTURE-HEAVY POST

 Welcome to Part 3 of our Country Village Quilt-A-Long featuring the Maison De Provence fabric collection by Connecting Threads.** 

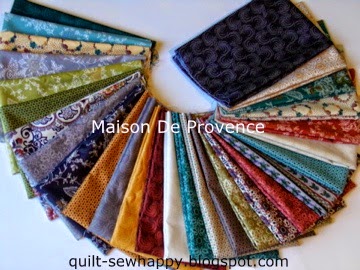
**A little birdie told me that they only have a small amount of the MDP fat quarter bundles left…so if you are wanting to make a quilt with the exact same fabrics as mine, you'll need to snap one up quick! You'll find the bundles under their Pre-cuts tab.

In case you missed them, here are the links to Part 1 and Part 2 of the quilt-a-long. You will also find links to each step under the Country Village QAL tab as they are published.


I wanted to talk a little about the difference between directional and all-over prints. The stripe on the left is definitely a directional print as the stripes run in one direction. You have to show more care when piecing a block using directional prints as you want the stripes to all run in the same direction(i.e.: up and down or side to side…but not both!).

It is much easier to piece blocks using an all-over print(at right), as once cut into squares it will make no difference which way you orient your squares in the block.

I thought you would like to see my thread/fabric trimmings bowl! It is actually a dip bowl, but I when saw it at Value Village I had another use for it! I keep it at the side of my sewing machine so that I can put stray threads in it. I did have one of those thread-catcher bags that hang over the edge of the table, but I found it was more of a pain than a pleasure to use.


Here we go:

I wanted to start off with the block center, which is an Hourglass block(basically a quarter-square triangle block). 

Now that all of your fabrics are cut and you have drawn the sewing lines on the backs of your 6.5" squares of center fabric, it should go very smoothly. I used my Quick Quarter ruler(shown near the end of Part 2) from Connecting Threads do this and my sewing lines were nice and even. 

I also wanted to show you how to orient(above) the one pieced square we have of the center fabric.

Note: My "center" fabric is the pale orange print.

Lay your 6.5" square of block fabric(from one of your fat quarters) face up, being careful to orient the directional print so that it runs up and down. Put the pre-lined 6.5" square of center fabric on top, right sides facing. Place your center square so that your drawn sewing lines start at the top left, then end at the bottom right. 

Pin near each end and in the middle of the drawn lines. Sew along your right drawn line, then turn the sewn square 180 degrees and sew along the left drawn line. Do not sew on the center line. 


*I am showing 2 block centers here*

Cut your sewn square in half, using the drawn center line as your guide. You will now have 2 half-square triangles. Press your seams closed first, then open up these hst's and press the seam allowance towards the fat quarter fabric(away from your center fabric). 

Draw your two sewing and one center line on the wrong side of one of these half-square triangles. When you pin the two hst's together, right sides facing, use your fingertips to help to align your upper and lower seam allowances so that they nest snuggly. As before, sew on your 2 sewing lines. Do not sew on the centre line.


Cut your square in half using the center line as your guide. Press the seam, then open up your two quarter square triangles and press the seam allowances either up or down. 

Take your 6" x 6" ruler and trim these squares to measure 5.5" square. All you have to do is find the 2.75" mark on your ruler and place that at the center of your qst(see arrow). You want the diagonal line on your ruler to match up with one of your diagonal seam lines and do the same for each of the 4 sides. 

Measure again to be sure that your block is 5.5" x 5.5". You only need one of these squares, so pick the best one and put the other one to the side for another project. I am thinking about sewing them into a strip and piecing them into my backing fabric.


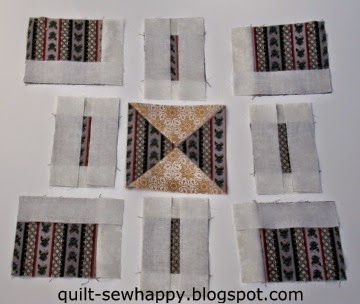
Just as a reminder…for each block you will need your pieced HST in one specific print, 4-4.5" x 4.5" squares of another print, 4-3.5" x 3.5" squares in the same print as the 4.5" squares, 12-1.5" x 5.75" strips of tone on tone, 4-1.5" x 4.5" strips(t-o-t), 8-1.5" x 3.5" strips(t-o-t), and (not shown…oops, I forgot!!!) 4-2.5" x 2.5" squares(t-o-t).


Lay all of your squares out as they will look when sewn. You will have a 4.5" square at each corner, a 3.5" square in the top center, middle sides and bottom center, plus your pieced hst block center( I put the one with the same fabric there by mistake…sorry!). If you are using a directional print, please make sure your stripes are all running the same way as the above are.


I'm a graph paper gal when it comes to designing! Please refer to this drawing when it comes to placing your "pathways" rectangle strips and flippy corners(tone-on-tone fabric for me).


Place your 8-1.5" x 3.5" rectangles at the top and bottom of each 3.5" square, as shown. Now position your 4-1.5" x 4.5" strips on the side of each 4.5" square. It is very important that you place your strips as shown. 

I also put pins at the outer corners of the 4.5" squares and on the long edges where the 5.75" strips will go, for easy reference(so I don't get confused!). Pin well, stack and transport to your sewing machine.


I like to chain-piece as much as possible, reducing the amount of time that I have to get up from my machine. I start with the 3.5" squares, then sew the 4.5" squares without cutting in between each square. I cut the chain of the sewn 3.5" squares, bring them to the front of my machine, then sew the opposite sides.


Cut the squares apart.


Press the squares as they lay to set the seams. Using the side of your iron, press the t-o-t rectangular strips to the side of the print square.


Lay your block out again, so that you can see where to add your next strips(refer to graph paper diagram above).  As you can see, the pins you put in each corner and on one side of each 4.5" square make it easy to lay out your squares. 


Lay your 12-1.5" x 5.75" strips on top of the pins you placed earlier. Remove these pins carefully from the squares then pin your 5.75" long strips to the squares. You will notice that you have a bit of extra length in these strips. Do not stretch your square to fit, you will trim the excess away later. 


Pin your 2.5" squares to the outer corner of the corner squares. Stack and sew all 8 squares.


Bring your 4 bordered squares like the one above, to the ironing board. Press to set all seams, then use the side of your iron to press the t-o-t fabric towards the outside edges of the squares. 


Trim the flippy corners of your 4 corner squares, making sure that you trim just 1/4" to the right of the seam line. 

Press to set the seams, then use the side of your iron to press the t-o-t corners  and the 5.75" strips towards the outer edge of each print square.


Trim all 8 squares, making sure that they measure 5.5" x 5.5". I position my 6" x 6" ruler so that the 1.5" line rests on the inner edge of the t-o-t strip, as seen above. Double check that your block measures 5.5" x 5.5" and is square.


Carefully lay out your blocks and center square, so that they match the above graph paper diagram and the photo of the block at the start of this post.


Flip the three squares at the right over to the left, so that they are lying face-down on the squares on the center column. Pin down the right hand sides of each pair of squares, right-side-together. Stack then chain-sew each seam. Do not cut the threads that hold the three sewn squares together.


This is how your partially-finished block should look.


Do the same with the squares in the left column. Do not cut the threads that hold the three squares together.


Your block should now look like this.


Fold the top row over the middle row, right-sides-together. Pin well, especially at the seams, and sew, nesting the cross seams. Fold the bottom row up over the middle row, right-sides together. Pin well as before and sew.


The back of your block should look like this. Don't press yet!


You will see little thread loops from when you joined the squares in the four inner corners. Trim these off now.
Don't press yet!


Put your quilt block on your ironing board and use your long ruler to check to see if it measures 15.5" x 15.5" square. If your block is a little short in an area or two, first measure across the top and bottom edges to make sure they are at least 15.5" long, pinning your block corners to your ironing board. Then measure through the centers, using your pins to stretch-block your quilt block in the same way that you would block a freshly-washed wool sweater before it dries on a flat surface. 

Give your quilt block a spritz of water and let air dry for about 5-10 mins. Your quilt block should now measure 15.5" x 15.5" square. 


Now you can press your quilt block. As you can see above, I open up the four spots at the inner corners so they lay flat, and then press one seam in the up position and the seam following in the down position. This is called "pinwheeling your seam allowances". You will have less bulk and distortion at your crossed seams if you do it this way.


Your finished quilt block should look something like this. I did a BIG boo-boo…can you see it??? The fabrics in the Hourglass block are supposed to be: center print AND a print that is DIFFERENT form the rest of the block! Oh dear…in my defence, I was rushing to get this block done and the steps photographed as we were expecting rain the next day. 

I will have to un-pick the top and bottom rows, then take apart the middle row to substitute the correct center block, then sew it back up again. These are the kinds of things I do when we are watching Netflix at night. Bleck!


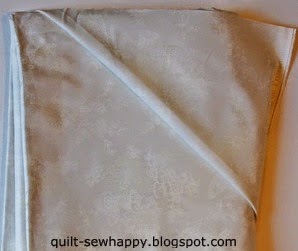
Oh, remember the 6.5" square of center fabric that we had to piece, at the end of Part 2? Well, this is it, and if you look very closely at the left corners of the center fabric, you will see the join, barely. It will be covered by the quilting and no one will ever know!!!

The next post of the Country Village QAL will be on May 27 for,
 Part 4: Adding Sashing Strips and Layout. 
This gives us 2 weeks to piece the 25 blocks needed for our Queen-sized quilt.

************

Sharing is caring!!! 
Don't forget that I am happy to share with your friends…feel free to pin to Pinterest, post on Google+ and Facebook, and Tweet away! Just please play fair and make sure your posts link back to this blog. *If you mouse/hover over the top right corner of my photos, a red "Pin-it" button will show up and all you have to do is click it to be taken to Pinterest. There is also another red button right beside it for posting to Facebook and Twitter. Or, you could always use the little square grey buttons at the end of this post. 

Thanks for reading and have a great day! 

Quilty Huggs, 

Jacqueline 

PLEASE NOTE: This blog accepts forms of compensation such as, but not limited to; fabric/notions/patterns/books in exchange for a posted review and/or tutorial. All comments/critiques/opinions are completely my own and are not those of the provider. This blog may also contain affiliate links and I will receive a small commission if you make a purchase after clicking on one of my links. Thanks so much!

Friday, May 1, 2015

Happy May Day!!! Foodie Friday and Country Village QAL Reminder!

Hi peeps! 


I thought I would start some blog posts with photos of the quilts I have in my house. These three are "rescue" quilts. 

I found the lighthouse one at a community services garage sale. They only wanted $2 for it, so I happily opened my change purse and walked away with someone's artwork. It is dated 2000 and has the initials of the maker on it too. 

The Santa wall-hanging is a small panel, and the maker had added 2 log cabin blocks on the top and bottom as well as a border. It even has 2 plastic rings sewn onto the backing for hanging! 

The third quilt is a pretty Dresden Flower block in 1930's style reproduction prints. If you look closely at the centre, you can see she stitched a 9-patch block then trimmed it into a circle-very original! 

I found both the Santa and Dresden at Value Village(of course!!).


Do you remember back in this post and this post, when I shared about making vegetable and meat/chicken stock? I extolled about the healthy benefits of consuming homemade stock/broth and showed a Vancouver business which sells cups of broth to drink. I even made a batch for my Dad to enjoy when he got out of the hospital a few weeks ago…and he has requested more!!!(He is doing very well, now that he is at home-thanks for your enquiries…huggs!)

Well, the above photo was in the Vancouver Sun today. Writing about this local company that has been making scratch-made stock-based soups and now sells it in the USA at Costco and Whole Foods. Even though they are located in the Vancouver area, they chose to start marketing their products in the USA and Japan. The soups are in the frozen section of the grocery stores and now they are about to start selling fresh soups in grocery deli's and local hospitals.

Here is the article, if you would like to read it:

Healthy soups boil down to big business for Richmond company

Global Gourmet Foods banks on fresh ingredients, homemade stock


The other day, I tried a new recipe...and it's a hit! Yumm! 
I found it on my favourite recipe site: allrecipes.com and I thought I would share it with you here:

Salisbury Steak with Mushrooms

1 lb lean ground beef
1/3 cup breadcrumbs(I used the seasoned ones)
1/4 cup chopped onions
1 egg, beaten
1 t. salt
pinch ground black pepper
2 cups beef broth
1 lg. onion, thinly sliced
1 cup sliced mushrooms
3 T. cornstarch(I ended up using more as I had added more stock than required)
3 T. water

1. Combine gr. beef, bread crumbs, chopped onion, egg, salt, and black pepper in a bowl until evenly mixed. Shape into 4 patties, about 3/4 inch thick.

2. Fry patties in a large frying pan until browned on both sides-about 10 mins. Add beef broth, sliced onion, and mushrooms, bring to a boil. Reduce heat to Low, cover and simmer until patties are no longer pink in the centre-about 10 mins. Transfer patties only to a platter and keep warm.

3. Bring beef broth mixture to a boil. Mix cornstarch and water in a small bowl(this is called a slurry and I use a fork to do this) and stir into the broth mixture. Cook and stir until broth mixture is thickened like gravy, about 1 minute or so. Pop patties back into the pan and warm through, coating them in the beef/mushroom gravy.

Serve with veggies(I served our with scalloped potatoes and corn niblets).
Makes 4 servings.
Enjoy!


I just love, love this stack of fat quarters…deee-lish! It will be so hard to cut into them. 


**Don't forget about my Country Village Quilt-A-Long featuring the above Maison De Provence fabric line from Connecting Threads. Part 1 can be found here, and you can also click the Country Village QAL, 2015 tab (found under the blog title) to find all the steps as they are posted (on Wednesdays). This tab will stay up indefinitely, so if you miss a post or need to be reminded about something, you can go to the step with ease!

Sharing is caring!!! 
Don't forget that I am happy to share with your friends…feel free to pin to Pinterest, post on Google+ and Facebook, and Tweet away! Just please play fair and make sure your posts link back to this blog. 
*If you mouse/hover over the top right corner of my photos, a red "Pin-it" button will show up and all you have to do is click it to be taken to Pinterest. There is also another red button right beside it for posting to Facebook and Twitter. Or, you could always use the little square grey buttons at the end of this post.

Thanks for reading and have a great day! 

Quilty Huggs, 

Jacqueline 

PLEASE NOTE: This blog accepts forms of compensation such as, but not limited to; fabric/notions/patterns/books in exchange for a posted review and/or tutorial. All comments/critiques/opinions are completely my own and are not those of the provider. This blog may also contain affiliate links and I will receive a small commission if you make a purchase after clicking on one of my links. Thanks so much!

Wednesday, April 29, 2015

COUNTRY VILLAGE QUILT-A-LONG! YAY!!! PART 1: Introduction, Schedule and Supply List ;-)

Hi peeps! 


For blocks and cornerstones

As promised in this post last Wednesday, today is the starting point for my Country Village Quilt-A-Long! Below is a hand-drawn example of the Country Village quilt block, designed by me(yay)! Sorry, I was not organized enough to have a sewn up a block for you beforehand…grr... 

So, please bear with me until next QAL post when there will be a real live block for you to see! I don't dare show you my own "test sample" block as it is made up with ancient, hideous, floral prints that I got in a scrap bag from Value Village!!!

I am working with the Maison de Provence fabric line(pictured above) by Connecting Threads. The photos don't do it justice at all, as the prints are so much more rich and vibrant. It is also economical-this line costs only $5.96 a yard!

Just so you know-Connecting Threads has generously provided me with the Maison De Provence fabric, a spool of Essentials thread and the Hobbs batting needed for this QAL, at my request.


Schedule(Wednesdays)...subject to change if I fall behind!!!

1. April 29- Introduction, schedule of posts and supply list.

2. May 6-Cutting fabrics for the Country Village blocks, cornerstones and sashing strips(we will cut the borders and binding strips in later posts).

3. May 13-Instructions for piecing the Country Village blocks.

***4 week break for piecing the 25 blocks***

4. June 17-Adding lattice strips, corner stones, laying out the blocks and sewing them all together. (I have a special way of doing this!)

5. July 1-Cutting and adding both borders.

6. July 7-Preparing the pieced backing and label.

7. July 14-Spray-basting the three-layer quilt sandwich.

**Break now till mid-September/October. It is just too hot to machine quilt!**

8. TBA-Machine Straight-Line and Free-Motion Quilting.

***2+ week break to allow for machine-quilting the entire quilt***

9. TBA-Cutting and sewing the binding to the quilt. 

10. TBA-View of the finished quilt after washing.

These are the three fat quarters that I removed from the 28-piece Maison De Province fat quarter bundle. The print on the left will be used for part of the Country Village block centres and the middle print is the "background" print. I might use the print on the right as corners on the outer border, but that will have to wait till the blocks are put together into a flimsy!

Fabric Requirements and Basic Supplies

*I have included the Connecting Threads fabric names and stock numbers so that you can make your quilt with Maison De Provence, exactly like mine…or you could choose another of their lovely fabric collections!

-25 dark or medium-dark value fat quarters(for blocks)*. I used 25 of the 28-piece Maison de Provence fat quarter bundle, #7213.(A fat quarter is a 18" x 21"-22" cut of fabric). * you could use a linear quarter yard cut(9" x 42") of fabric instead of a fat quarter. 

-0.75 yard of a contrasting medium to medium-light print(block centres).* French Medallion-Parchment, #7172, shown above on left. 
*you will have to piece one square from scraps if you have not also purchased the 28-piece fat quarter bundle…or you can always purchase 7/8ths yard of this fabric.

-4.5 yards of a light fabric(background)-can be a tone-on-tone like mine, above centre and below). Colette-Parchment, #7165.*
*I don't pre-wash my fabrics, so if you do, please purchase 4.75 yards of this fabric. The same goes if you are unsure or new to rotary cutting(buy 4.75 Yds).

-0.5 yard of a dark or medium-dark co-ordinating print(inner border), see burgundy print, second photo down. Feathered Sprigs-Rosewood, #7178.

-1.5 yards dark print,(outer border), see dk. green sprigged print in second photo below. Colette-Med. Mineral Green, #7163.

-1.25 yards dark co-ordinating stripe(bias binding). Cote d'Azur-Multi, #7157.

-2.5 yards wide backing. Amelie 104 Wide Backing-Lt. Mineral Green, #7191.

-100% Cotton or cotton/poly blend thread-Essentials brand in Sandstone, #20950. 

-Batting-queen-sized, must be at least 90" x 90". Hobbs Tuscany Cotton/ Wool Blend Batting, #21303. 

Also: Sewing machine in good working order, rotary cutter with new blade, various square and rectangular acrylic rulers, straight pins, new all-purpose needle in your machine, quilting needle, iron and ironing board.

PS: You can copy and paste these requirements(and the schedule as well) into a word document to make it easier to refer to.

**I will be putting all of the Quilt-A-Long posts under their own tab just under my title header. That way you can find a specific step with ease!


This is for the "pathways" or "background" of the blocks and lattice strips. It is difficult to see in my photo, but this is a tone-on-tone print.

From left: Centres, inner border, outer border and binding-to be cut on the bias.


Backing fabric and my thread choices for piecing and machine-quilting. For piecing, I always use two colours, one slightly darker than the other. For this project, I will be using my 5,000-yard cones of Sandstone, #20982, in the needle, and Taupe, #20980 in the bobbin. I find it easier to distinguish which thread is top and which is bottom this way. I got these two cones during a Connecting Threads sale and they last a super looong time!!!

Queen-sized cotton-wool blend batting. I am SOOO stoked to try this batting out! Has anyone used cotton/wool batting before? It is very light and soft and I think it would beautifully show off hand-quilting.

I hope that you are as excited as I am to get started on this Quilt-A-Long! 

Feel free to leave a comment or email me(my addy is on the "Drop me a line" page), if you need some assistance or even if you don't; I love hearing from you!

Sharing is caring!!! 
Don't forget that I am happy to share with your friends…feel free to pin to Pinterest, post on Google+ and Facebook, and Tweet away! Just please play fair and make sure your posts link back to this blog. 

*If you mouse/hover over the top right corner of my photos, a red "Pin-it" button will show up and all you have to do is click it to be taken to Pinterest. There is also another red button right beside it for posting to Facebook and Twitter. Or, you could always use the little square grey buttons at the end of this post. 


Thanks for reading and have a great day! 

Quilty Huggs, 

Jacqueline 

PLEASE NOTE: The writer of this blog accepts forms of compensation such as, but not limited to; fabric/notions/patterns/books in exchange for a posted review. All comments/critiques/opinions are completely my own and are not those of the provider. This post may also contain affiliate links and I will receive a small commission if you make a purchase after clicking on one of my links. Thanks so much!

Tuesday, March 3, 2015

A Charming Smile, Tuesday Tip and a Contest to Enter!

Hi peeps! 


How is everybody today? I am at the tail-end of a four(yes, four) day migraine…not fun at all! The sun is shining, it is fairly mild and I'm talking to you…so a much better day! 

Before I was laid low I managed to get my citrus batik HSTs for the table topper all trimmed…YAY!!! Now I get to have fun and play!! I'll get you up to date on that!!!


Did you know…Much like velvet and corduroy, thread has a nap?...I KNOW!!!
I only found this out recently…this is after almost 40 years of plying a needle…

When you hold the end of the thread that is coming directly off the spool and press your fingers while running them down the thread, it will feel smooth. Now do the reverse…you can actually feel the difference.


This is an important thing to consider, especially if you do a lot of hand sewing. So, what I do is thread my needle BEFORE I have clipped my length of thread. That way I will remember which tail of thread is which. I keep that end of the thread short and cut at the end of the longer piece. The longer piece will always be on the nap...and the shorter piece will be against the nap…but that is okay as it's the longer piece that I'm concerned with.


Once I am sure which thread-end is which, I knot the longer end. It really makes a difference! I do a lot of hand sewing at night in front of the TV(will show you in a later post) and can tell you that my thread runs through the fabric pieces smoothly and I rarely get a tangle! Awesomeness!!!


Last night I managed to get another men's shirt cut up…I really have to start removing the buttons from the placket strips…I've got several of them waiting for attention! As you can see, this one has an embroidered logo and I will try to find a use for that. The shoulder yoke and sleeve cuffs were lined in a nice chambray, which was an added bonus. 

This was one of the Kid's shirts, a men's size small, so there wasn't as much useable fabric. But, I had originally purchased it at half price from Value Village, it was worn for a year and now I have cut it up for quilting fabric…so it was a super-recycling project, and plus I really liked the pattern/colours. I might give it a bit of a starch treatment as the resulting fabric is a tad thinner than the other shirts I have slated for demolition.


Don't forget to enter Craftsy's #Secret Stash Contest! Prized include a secret stash box of goodies as well as a Craftsy class of your choice! Bonus!!!

Stay tuned as I have new sponsor news AND another giveaway coming soon!

Thanks for reading and have a great day! 

Quilty Huggs, 

Jacqueline

Tuesday, February 3, 2015

Tutorial Tuesday: Deconstructing a man's cotton dress shirt for it's fabric!

Hi peeps!


So I thought I would show you how I take apart a men's dress shirt for the purpose of using the fabric for quilting. I like using X-L or Large-sized long-sleeved 100% cotton men's shirts as you get the most useable fabric out of them.

Here we go! 

Pick up a men's dress shirt from your local thrift store, or even your husband's closet-just make sure it's one he doesn't wear anymore! I get mine at Value Village, usually when they have a half price sale. Give it a good wash and dry. You'll be tempted to iron it, but I have found it easier to just start cutting as-is, then give the fabric pieces a nice press afterwards.


Start by cutting the collar(with collar-yoke attached), cuffs and button plackets off. 


Cut off all the sewn edges of the cuffs and collar, removing the collar yoke at this time. I save all the buttons of the shirt and safety pin them together(bottom left of photo).


Turn the entire shirt inside out and remove the sleeves by cutting them away just below the  shoulder seam line. Cut out the button placket too(as above) and add the buttons to the safety pin you have already started for this shirt.


Next, cut the shirt-back away from the shirt-fronts at the shoulders, again cutting just before the seam allowance. Cut the yoke off of the top of the back piece, then cut around the edges of the yoke to separate it into two pieces.

Edited to add: I usually trim the bottom hems off at this step.


If one of the shirt-fronts has a pocket, cut that front section right across the middle side to side, just under the pocket. Then cut around the three sides of the pocket(left, right and bottom), just inside the seam. You can see the two pocket pieces and cut-aways above left.

Or, you could save the pocket for another project such as; using it when you construct a tooth-fairy pillow or, hand-sew the pocket to your quilt back, after you have finished quilting it. Then you can store a few pieces of the fabrics that you used in the quilt for mending it if it gets damaged or worn. Just make sure you leave yourself a nice seam allowance(before cutting) so that you will be able to sew the pocket into your item and to sew the little pocket full of fabric shut if it is stitched to the back of a quilt.


Here you can see the skinny strips above left (from the cuffs and collar), as well as the two yoke pieces and both front sections. I have ironed all pieces at this point, except for the button areas. The skinny pieces will go into my tub for string quilts, and I will probably cut the larger pieces into my favourite sizes( 2" sq, 2.5" sq, 4.5" sq and 5" sq charms).


Here are the back(folded) and sleeves(folded). The sleeves are great for cutting 2'5" strips and they will go into my strips tub. It always surprises me how much fabric is in a sleeve! I will leave the back as-is, as it is quite a large piece of fabric. This one measures 24" by 27" at it's widest points.


This is perfect TV work. I will grab my handy little seam ripper and release the buttons from the plackets, then I will store them on that same safety pin, in my button jar. The label is easy enough to remove with same ripper. Then, to camouflage the stitch holes where the label was, I just run the tip of my seam ripper gently across them. You will see the stitch holes 'magically' disappear.


This little pile is ALL that is left over. Pretty cool, eh?


I got started on the table runner I mentioned in this post

I finally got my Frixion pen to work. The little metal ball at the tip of the pen was stuck, so I got some rough, heavy-duty paper(that had some 'tooth' to it) and just scribbled away till the roller ball started working. Oh, duh!!!


I was having so much fun(not!) drawing the sewing lines on my pairs of squares that I went overboard(didn't pre-read the pattern…) and traced out the sewing lines on ALL of the squares. Double-duh!!! But it is with the Frixion ink and the marks will just iron away.

Then, over to my chair, watching TV, I used my 'special' pins(they are very short and very sharp and I keep them for when I am working on batiks only) and just pinned near my starting and ending lines. Now I am ready to shoot them through the sewing machine.


I found a new-to me magasine at the grocery store today. It is called Make it Vintage, and has loads of ideas for changing up old or thrifted items and making them your own. There was another magasine that was similar, called Vintage Style, but it was a lot more than I am willing to spend on a magasine…so I just had a quick look through it!

Question of the Day:

Have you bought, or looked through a new-to-you magasine lately? and, if so, which one was it?
Thanks for reading and have a great day!


Quilty Huggs,

Jacqueline