
Did ya miss me???
As you can see above, I started free motion quilting the Citrus Batik Table topper. My Pfaff was also in the hospital, so I got out my old 1990's era Kenmore. It is a very basic machine, having only 14 different stitches, but it is a workhorse and can do the job. I decided to try the 12-weight Aurifil thread I have, in a yellow-gold colour and was going swimmingly when all of a sudden I started getting thread breaks and all sorts of bird's nests of thread on the back. Yeesh! I tried everything I could think of…rethreading the machine, changing the bobbin, changing the needle and cleaning out the dust and lint…but nothing seemed to work, so I put it aside. Then I got my Pfaff back and would you believe, I had the exact same problem. So I did all the same things to my Pfaff and still was having problems. Double-Yeesh!
I have come to the realization that neither of my machines like 12-weight thread. I have unpicked loads of nasty stitches, but even though I will have to change threads and thread colour, I will not unpick the parts that came out looking okay. If this was to be a gift, that would be another story, but as this is just for us, I will let it go. I just have to keep repeating to myself "let it go, let it go". My Virgo self really dislikes things that aren't just right. Ah well….
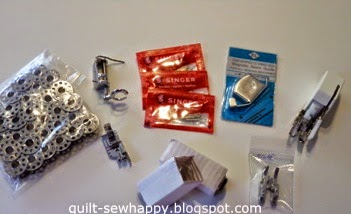
I got some great Happy Mail over the past couple of months. I bought a bunch of machine parts off of Ebay for my 1948 Singer 15-91 including a quarter-inch foot, Singer branded needles, a walking foot, lightbulbs, magnetic seam gauge, a bunch of bobbins and an springed open-toe foot for FMQing. When they arrived, I was please to see that these parts will also fit on my Kenmore…bonus!
I also finally invested in a quarter-inch foot for my Pfaff. Both quarter-inch feet have a little metal guide thing on the right hand edge of them that prohibits you from pushing too much fabric to the right of the foot, thereby allowing you to achieve a perfect quarter-inch seam allowance. Yay!

These two purchases were from Massdrop. The fat quarter bundle is called "Enchanted", and even though the bundle didn't include the 'main' all-over design that ties the whole line together, I got such a good deal that I couldn't pass it up. Plus, I can always find that main print at Fat Quarter Shop or Pink Castle(2 of my favourite USA-based online shops).
The 100-count boxes of Schmetz needles were also a steal on Massdrop. I got one box of #14 needles-these are my go-to needles for all-purpose sewing. I also got a box of #16 needles, which are my favourite machine-quilting needles.
Massdrop has very reasonable shipping charges(even to Canada!) and I was really pleased to find out that they combine shipping on multiples of the same item!

I joined a Canadian De-stash group on Facebook and got these two 2-yard pieces for a bargain. I just love those happy purple flowers! I will be using the primary colours stripes for binding on kid quilts. I always cut my binding on the bias, as it is more sturdy. Stripes cut on the bias create a neat finish.
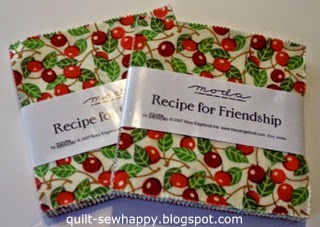
I got these two Mary Engelbreit charm packs for about $10 each from the same Facebook group. The top print doesn't do the whole pack justice…there are so many cute prints in there, in reds, blues, greens and black. I am planning to make one of the free Fat Quarter Shop patterns for charm packs with them.
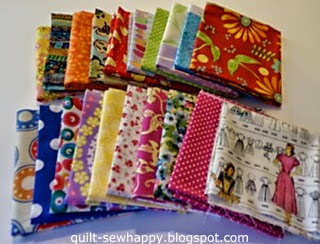
I also joined a couple of Canada-only swap groups, again on Facebook and these are the fatties I have received so far! The red one at the top right is a Pat Sloan print and I was so excited when it came as I have never had any of her prints and always thought they were super-cute!
I bought the Simplicity pattern print, bottom right(neat, eh?), and the multi lifesaver print-bottom left, from one of the swappers who was having a de-stash on the other group, and it came with my swap!
***********************
So…now I have an exciting announcement!!!

I will be starting a Quilt-A-Long next week, here on the blog! I contacted Connecting Threads to see if they would like to supply the fabric for me to host a Quilt-A-Long, using a block that I have designed…and they said yes!!! Yippee!!!

The first post will be a photo of the block and fabric requirements for a queen-sized quilt. The blocks are nice and big, at 15.5" square, including seam allowances(15" sewn in), and you will only need 25 of these easy blocks, plus 2 borders, to make a comfy queen-sized quilt! The posts will be about two weeks apart, to allow everyone(myself included!) enough time to complete each step.
You do not have to make a queen quilt, but it would be great if you could participate…three of these blocks sewn in a row would make a nice table runner and four blocks set 2 x 2 will make a nice square table topper.
I will be putting a Quilt-A-Long tab at the top of the blog, to make it easy to find each week's post, in case you don't have the time to make one now, and for easy reference too!
I will be using the Maison de Provence fabric line by Connecting Threads, check it out! Now that I have it in my hot little paws, the rich tones(so beautiful in person) kind of remind me of the spices brought back on the Silk Road by Marco Polo!

The "COUNTRY VILLAGE" Quilt-A-Long will start on Wednesday, April 29, 2015.
Come join us!
************************
It has been a long and stressful month with my Dad being in the hospital. He had 2 emergency surgeries and spent most of his stay in the Close Observation Ward, due to the nature of his medical situation. I am happy to report that he is now back home and enjoying a good night's sleep in his own bed! Thank you so very much for the comments and messages offering prayers…it really means a lot to me that you took the time to tell me you care. Big Huggs to you!
*************************
Sharing is caring!!!
Don't forget that I am happy to share…feel free to pin to Pinterest, post on Google+ and Facebook, and Tweet away! Just please make sure your posts link back to this blog. *If you mouse/hover over the top right corner of my photos, a red Pin-it button will show up and all you have to do is click it to be taken to Pinterest. There is also another red button right beside it for posting to Facebook and Twitter. Or, you could always use the little grey square buttons at the end of this post.
Thanks for reading and have a great day!
Quilty Huggs,
Jacqueline
PLEASE NOTE: The writer of this blog accepts forms of compensation such as, but not limited to; fabric/notions/patterns/books in exchange for a posted review. All comments/critiques/opinions are completely my own and are not those of the provider. This post may also contain affiliate links and I will receive a small commission if you make a purchase after clicking on my link. Thanks!


