Showing posts with label Connecting Threads. Show all posts

Wednesday, June 17, 2015

COUNTRY VILLAGE QAL, PART 4: Adding sashings and sewing it all together!

Hi peeps!


Did ya miss me??? 
We have been having some really up and down weather from about mid-May to last week and that factor does some real damage to me in the form of multi-day migraines…I had several...NOT FUN…

The good news is that it looks like the good weather is now here to stay! YAY!!!


Welcome to Part 4(finally!!!) of the Country Village QAL, featuring Maison De Provence by Connecting Threads. Today we will be adding the sashings and sewing the quilt top together. 

In case you've missed them, you can find Parts 1 through 3 under the Country Village QAL tab across the top of my blog, under the header.

I managed to get all 25 quilt-a-long blocks completed last week, so hurray for me!!! I was overly ambitious, thinking that I could get all of the blocks completed within two weeks, groan...

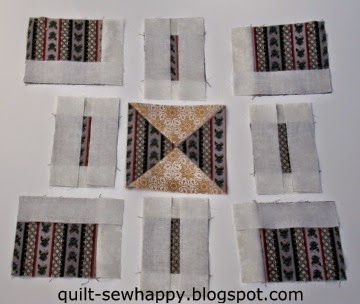
When I was laying out the blocks for the above photo, the sun was not in my favour. By the time I had arranged the blocks into the pretty fan above, the sun had moved and all I had was a small space in our front walkway that didn't have too many shadows. I guess you could say that I have used the sunlight and dark shadows to create an artistic photo…yea, I'll stick to that…hee hee!!!


So…here we go!!!

Collect your 60 x 15.5"-long sashing strips and 36 of the 1.5" squares we cut previously. You'll want to only use the darker-coloured squares, so that the cornerstones will be a 'pop' of colour amidst all the white/t-o-t sashing. 

You can use the lighter-coloured squares in a different project, or as a border around your quilt label!


Add one 1.5" square cornerstone to one end of 24 15.5" sashing strips. Add a 1.5" square to each end of 6 15.5" sashing strips. Press the seam toward the sashing strips.


This is how I mark my blocks. As you know, we have 25 blocks set 5 x 5. I mark the position of my blocks in this way-the center block number is circled and the top, bottom and sides have lines which correspond to their placement.


Now here is the fun part!!! I already knew that the dark red block (#13, at center) would be the center block, as it is the same pattern as the inner border and I didn't want them to be near each other. 

I decided that two pairs of eyes are better that one and got the Hubs to give me a hand! It took us about 15 mins. to decide which block would go where(making sure to align each block with the center fabric running downwards) and then we labelled them. I just use a straight pin to attach the marker to each block and when I'm done, I keep them pinned to the paper marker so that I don't use them for piecing etc.


Now we will do the unusual part. 

I really dislike working with long, skinny sashing strips as all sorts of things can go wrong. I attach the sashing strips to the blocks before sewing all of the blocks together! It only takes a little bit of preparation to do it this way and it has always worked out well for me.

Pin a plain sashing strip down the left side of each block, right side facing the block. Pin a plain sashing strip(right side down-you can assume that all of the directions mean to pin with the right side down) down the right side of blocks #5, 10, 15, 20 and 25. 

We will look at row #1 as it is a bit different. I do it this way to limit the amount of time spent getting up from my machine to re-pin.

Pin a one-ended(a strip with one 1.5" square stitched to it) strip across the top of blocks #1-4. Pin a one-ended strip across the bottom of blocks #1-4. You will have to stop pinning these strips about 2" before the left side of the block, as that side already has a plain strip pinned to it.

Pin a two-ended strip across the top of block #5. Pin a two-ended strip across the bottom of blocks #5, 10, 15, 20 and 25. You will have to stop pinning about 2" away from the left and right sides of these blocks as they are already pinned.


Here is block #10. You can see the plain sashing strips are pinned down the right and left sides of the block. Then the two-ended strip is pinned loosely across the bottom of the block, leaving room so that the side sashings can be stitched down first. 

Then all you have to do is flip all of the side sashings to the outside of the block and finger-press, making sure that the seam allowance falls towards the sashing. Then you can pin and sew the one-ended and two-ended sashing strips to each of the blocks.


When you are stitching the sashings to the block, it is much easier to stitch with the sashings on top so that you can ease a slightly larger block in. 

Do not pull the sashing to match the length of the block! This will make is very difficult to match up and piece all of your blocks together at the end.


Once you have sewn all of the sashings to the sides of the blocks, you can start sewing your rows together. You don't need to lay them out in a row as they are all marked! I sew the #1 block to #2, then #3 to #4. I sew #5 to the #3-4 combo. The #3-4-5 combo is then sewn to the #1-2 pair and you have a row done! Follow this procedure for the remaining 4 rows. 

Give each row a light press, making sure that the seam allowances are pressed towards the sashings(away from the blocks).


Once your rows are all sewn you can sew them together to make your quilt top.   Remember to sew with the sashing strips on top. See how the first two rows look together? I really like the little 'pop' of colour that the cornerstones bring! Four blocks set 2 x 2 would look really nice on a table.

I don't pair up the rows at this step(ie: sew row #1 to #2 and #3 to #4 etc.). Instead, I sew each row subsequent to the next to make the quilt top. This allows you to continue easing in your blocks, if needed.

Here is the end of Part 4 of the Country Village QAL. I hope to have Part 5: Cutting and adding the borders, ready for next Wednesday, June 24.

Sharing is caring!!! 
Don't forget that I am happy to share with your friends…feel free to pin to Pinterest, post on Google+ and Facebook, and Tweet away! Just please play fair and make sure your posts link back to this blog. 
*If you mouse/hover over the top right corner of my photos, a red "Pin-it" button will show up and all you have to do is click it to be taken to Pinterest. There is also another red button right beside it for posting to Facebook and Twitter. Or, you could always use the little square grey buttons at the end of this post. 

Thanks for reading and have a great day! 

Quilty Huggs, 

Jacqueline 

PLEASE NOTE: This blog accepts forms of compensation such as, but not limited to; fabric/notions/patterns/books in exchange for a posted review and/or tutorial. All comments/critiques/opinions are completely my own and are not those of the provider. This blog may also contain affiliate links and I will receive a small commission if you make a purchase after clicking on one of my links. Thanks so much!

Friday, May 22, 2015

Follow-Up Friday: More Of My Quilts and Are You My Giveaway Winner?

Hi peeps! 


My Hubs named this one "Mountain Dew & Grape Crush"!
I though I would continue on with showing you some of my quilts(the ones that I own-most of my big quilts were gifts and never got photographed as I didn't have a digital camera then).

This one is completely hand-pieced, including adding the borders. I was also experimenting with a high-loft polyester batting(ewww!!). As you can see, I had a bit of trouble machine-quilting the poly batting-things kept on shifting…grr! 

This was the last time I used poly for anything!


Starflower

When the Lion's Gate Quilting Guild(North Vancouver, BC) holds it's biannual quilt show, there is an interactive display where anyone can give hand-quilting a try. 

A guild member makes the quilt top and it gets put in a large, standing quilt hoop. Then throughout the day, different guild members would stay and give pointers on hand-quilting techniques to anyone who was curious and wanted to try their hand at it(there were a lot of men and kids keen to try!).

The partially-quilted quilt is then raffled-off…and one year I won it(above)! I finished all of the hand-quilting, then scoured my substantial stash; looking for the right binding fabric. I think the greyish-blue I chose fits in very well.


Now to the giveaway winner!

I asked my Hubs to choose a random number between 1-119(the number of comments) and he chose:

#112 Sheila, who wrote:
Congratulations on your blogaversary . I follow your blog via email .thanks for the chance.
Sheila-look for an e-mail from Quilt, sew Happy! in your inbox!!!
Thanks so much to everybody who entered my 1st Year Blogiversary Giveaway and who signed-on to follow my blog! Stay tuned-there are more fun things on the way!*
*A big THANK YOU to Connecting Threads for supplying this great prize!


Craftsy is Having a Big Long-Weekend Sale!!!

Nothing beats a long weekend...except for a long weekend full of crafting fun! Get everything you need for a creative “stay-cation” with Craftsy’s Memorial Day Sale. Enjoy up to 70% off all kits, fabric and yarn, up to 60% off sewing project kits and up to 40% off art, paper craft and cake decorating supplies. You’re sure to snag the items you’ve been eyeing at major savings. 

The sale runs from 5/21/15 through 5/25/15 @11:59pm MT!*

*If you are not already a member of Craftsy, you will have to join and create a basic profile of yourself. This is free and takes mere minutes and then you can shop your buns off! Hee Hee Hee…get it? You are sitting on your buns when you are internet shopping!!!


Remember a few months back when I was drooling about the RJR Letters Home Tea and Biscuit Table Runner(above)? Well, I can finally get it! It is now priced at $28.61(CA$)-about $24.00 US$*. That's 45% off the regular price! Yay!!!
*Sorry about the CA$ to US$ price conversion…all of my Craftsy prices show in Canadian dollars only.


Sharing is caring!!!
Don't forget that I am happy to share with your friends…feel free to pin to Pinterest, post on Google+ and Facebook, and Tweet away! Just please play fair and make sure your posts link back to this blog. 
*If you mouse/hover over the top right corner of my photos, a red "Pin-it" button will show up and all you have to do is click it to be taken to Pinterest. There is also another red button right beside it for posting to Facebook and Twitter. Or, you could always use the little square grey buttons at the end of this post. 

Thanks for reading and have a great day! 

Quilty Huggs, 

Jacqueline 

PLEASE NOTE: This blog accepts forms of compensation such as, but not limited to; fabric/notions/patterns/books in exchange for a posted review and/or tutorial. All comments/critiques/opinions are completely my own and are not those of the provider. This blog may also contain affiliate links and I will receive a small commission if you make a purchase after clicking on one of my links. Thanks so much!

Wednesday, May 20, 2015

WIP-IT Wednesday: Country Village QAL Blocks & Giveaway Reminder!

Hi peeps!


This was the second quilt I made and my first try at hand-quilting. You'll notice that there is no close-up photo as I don't want you to see the "toe-catcher" hand-quilting stitches…they are truly awful!!! This one lives on one of my quilt racks, so no one can see it.

The quilt started with a remnant of the cute pigs in pyjamas print, which is to the left and right of the center square, as well as the outer border.


How is everyone doing with their Country Village blocks for the quilt-a-long? 

I have ten finished and pressed, including the one block I had to take apart and swap the center out. 

Sorry about the drab lighting, the area where I sew has awful light and I have to sew with a bendy lamp that almost touches my face.


I have the eleventh block all ready for trimming. I like to finish my sewing day with an item that is already started, so that next time I can jump right in!

I wanted to show you my bag of selvedges from Maison De Provence, the fabric collection by Connecting Threads. They are so pretty! 

Piecing with selvedges seem so be all the rage at the moment, so I'm thinking I should at least give it a try. So funny, when I started quilting in the early 1990's, the selvedge was considered waste and now it is a part of the blocks you can make.


*Giveaway has ended and the prize has been claimed*

Don't forget to enter my 1 year Blogiversary Giveaway for a chance to win the 29-piece fat quarter collection of Line Dried from Connecting Threads

Comments close on Thursday, May 21 at 11:59 PM, PST. Comments must be on the actual giveaway post


Sharing is caring!!! 
Don't forget that I am happy to share with your friends…feel free to pin to Pinterest, post on Google+ and Facebook, and Tweet away! Just please play fair and make sure your posts link back to this blog. 

*If you mouse/hover over the top right corner of my photos, a red "Pin-it" button will show up and all you have to do is click it to be taken to Pinterest. There is also another red button right beside it for posting to Facebook and Twitter. Or, you could always use the little square grey buttons at the end of this post. 


Thanks for reading and have a great day! 

Quilty Huggs, 

Jacqueline 

PLEASE NOTE: This blog accepts forms of compensation such as, but not limited to; fabric/notions/patterns/books in exchange for a posted review and/or tutorial. All comments/critiques/opinions are completely my own and are not those of the provider. This blog may also contain affiliate links and I will receive a small commission if you make a purchase after clicking on one of my links. Thanks so much!

Sunday, May 17, 2015

Super Sunday: 1st Year Blogiversary GIVEAWAY!!! Woo-Hoo!!!

Hi peeps! 


As you have probably guessed from today's title…today is my 1 year anniversary of starting to write the Quilt, sew Happy! blog!!! Wow! I never imagined what kinds of things would come my way just from writing a quilting blog!

My great sponsor, Connecting Threads is offering a 29-piece fat quarter bundle of their newest collection, called Line Dried, (shown above and below) to one lucky blog follower. This line, like most of their in-house fabric collections, is a great value too: Only $5.96/yard!


The Line Dried collection reminds me of those lovely vintage aprons and table linens that you can come across while at the thrift store or country estate sales. So sweet! 

Connecting Threads also shows you which of their "basics collection" and Essentials brand thread coordinate with this line when you go to the Line Dried page under the Fabric tab on their website.

*Giveaway has ended and the prize has been claimed*

Now for the GIVEAWAY:

I am going to make it easy for you to enter to win this lovely fat quarter bundle;

-just follow this blog by email or with Bloglovin' and tell me how you do. There are windows to follow by email and Bloglovin' just below my profile blurb.

Note-If you choose to follow my blog via email you will receive a confirmation email from Feedburner(the email delivery company). This is not spam. You need to click the link in this email to activate your email subscription to this blog. If you don't, you won't get any of my posts and you won't be eligible to win this giveaway.

I only write 2-3 posts per week so I won't be clogging up your inbox!!!

That's it! Easy-Peasy!!

The giveaway will be open from today, Sunday, May 17, 2015 to Thursday, May 21, 2015. I will have The Hubs draw a number(the comment number) on Friday, May 22nd.

Please, please make sure I have a way to contact you. Most people don't even know that they are a "no-reply blogger" which means that their email address is not visible to anyone. So, if you are not sure if you are a "no-reply blogger" or not, please leave me an email address so that I can contact you if you are my winner. You could type your email address out this way: 
youremail at yahoo dot com, so that you won't get hit by scammers. I would never sell, share etc. your email address with anyone!


Remember in the Country Village QAL, Part 3 post where I made a boo-boo? …Well I did fix it and here's the photo. This is how your block should look; main fabric, then your center fabric and another fabric, for the center of the block.


After I got all of my block centers done, I laid out each pile of cut squares in the 25 different prints for the 25 blocks. Then I chose a center block to contrast with the main fabric and made little piles so I wouldn't mix them up like I did on the Part 3 post!


Sharing is caring!!! 
Don't forget that I am happy to share with your friends…feel free to pin to Pinterest, post on Google+ and Facebook, and Tweet away! Just please play fair and make sure your posts link back to this blog. 

*If you mouse/hover over the top right corner of my photos, a red "Pin-it" button will show up and all you have to do is click it to be taken to Pinterest. There is also another red button right beside it for posting to Facebook and Twitter. Or, you could always use the little square grey buttons at the end of this post. 


Thanks for reading and have a great day! 

Quilty Huggs, 

Jacqueline 

PLEASE NOTE: This blog accepts forms of compensation such as, but not limited to; fabric/notions/patterns/books in exchange for a posted review and/or tutorial. All comments/critiques/opinions are completely my own and are not those of the provider. This blog may also contain affiliate links and I will receive a small commission if you make a purchase after clicking on one of my links. Thanks so much!

Wednesday, May 13, 2015

COUNTRY VILLAGE QUILT-A-LONG, PART 3: Piecing the blocks.

Hi peeps! 


WARNING: PICTURE-HEAVY POST

 Welcome to Part 3 of our Country Village Quilt-A-Long featuring the Maison De Provence fabric collection by Connecting Threads.** 

**A little birdie told me that they only have a small amount of the MDP fat quarter bundles left…so if you are wanting to make a quilt with the exact same fabrics as mine, you'll need to snap one up quick! You'll find the bundles under their Pre-cuts tab.

In case you missed them, here are the links to Part 1 and Part 2 of the quilt-a-long. You will also find links to each step under the Country Village QAL tab as they are published.


I wanted to talk a little about the difference between directional and all-over prints. The stripe on the left is definitely a directional print as the stripes run in one direction. You have to show more care when piecing a block using directional prints as you want the stripes to all run in the same direction(i.e.: up and down or side to side…but not both!).

It is much easier to piece blocks using an all-over print(at right), as once cut into squares it will make no difference which way you orient your squares in the block.

I thought you would like to see my thread/fabric trimmings bowl! It is actually a dip bowl, but I when saw it at Value Village I had another use for it! I keep it at the side of my sewing machine so that I can put stray threads in it. I did have one of those thread-catcher bags that hang over the edge of the table, but I found it was more of a pain than a pleasure to use.


Here we go:

I wanted to start off with the block center, which is an Hourglass block(basically a quarter-square triangle block). 

Now that all of your fabrics are cut and you have drawn the sewing lines on the backs of your 6.5" squares of center fabric, it should go very smoothly. I used my Quick Quarter ruler(shown near the end of Part 2) from Connecting Threads do this and my sewing lines were nice and even. 

I also wanted to show you how to orient(above) the one pieced square we have of the center fabric.

Note: My "center" fabric is the pale orange print.

Lay your 6.5" square of block fabric(from one of your fat quarters) face up, being careful to orient the directional print so that it runs up and down. Put the pre-lined 6.5" square of center fabric on top, right sides facing. Place your center square so that your drawn sewing lines start at the top left, then end at the bottom right. 

Pin near each end and in the middle of the drawn lines. Sew along your right drawn line, then turn the sewn square 180 degrees and sew along the left drawn line. Do not sew on the center line. 


*I am showing 2 block centers here*

Cut your sewn square in half, using the drawn center line as your guide. You will now have 2 half-square triangles. Press your seams closed first, then open up these hst's and press the seam allowance towards the fat quarter fabric(away from your center fabric). 

Draw your two sewing and one center line on the wrong side of one of these half-square triangles. When you pin the two hst's together, right sides facing, use your fingertips to help to align your upper and lower seam allowances so that they nest snuggly. As before, sew on your 2 sewing lines. Do not sew on the centre line.


Cut your square in half using the center line as your guide. Press the seam, then open up your two quarter square triangles and press the seam allowances either up or down. 

Take your 6" x 6" ruler and trim these squares to measure 5.5" square. All you have to do is find the 2.75" mark on your ruler and place that at the center of your qst(see arrow). You want the diagonal line on your ruler to match up with one of your diagonal seam lines and do the same for each of the 4 sides. 

Measure again to be sure that your block is 5.5" x 5.5". You only need one of these squares, so pick the best one and put the other one to the side for another project. I am thinking about sewing them into a strip and piecing them into my backing fabric.


Just as a reminder…for each block you will need your pieced HST in one specific print, 4-4.5" x 4.5" squares of another print, 4-3.5" x 3.5" squares in the same print as the 4.5" squares, 12-1.5" x 5.75" strips of tone on tone, 4-1.5" x 4.5" strips(t-o-t), 8-1.5" x 3.5" strips(t-o-t), and (not shown…oops, I forgot!!!) 4-2.5" x 2.5" squares(t-o-t).


Lay all of your squares out as they will look when sewn. You will have a 4.5" square at each corner, a 3.5" square in the top center, middle sides and bottom center, plus your pieced hst block center( I put the one with the same fabric there by mistake…sorry!). If you are using a directional print, please make sure your stripes are all running the same way as the above are.


I'm a graph paper gal when it comes to designing! Please refer to this drawing when it comes to placing your "pathways" rectangle strips and flippy corners(tone-on-tone fabric for me).


Place your 8-1.5" x 3.5" rectangles at the top and bottom of each 3.5" square, as shown. Now position your 4-1.5" x 4.5" strips on the side of each 4.5" square. It is very important that you place your strips as shown. 

I also put pins at the outer corners of the 4.5" squares and on the long edges where the 5.75" strips will go, for easy reference(so I don't get confused!). Pin well, stack and transport to your sewing machine.


I like to chain-piece as much as possible, reducing the amount of time that I have to get up from my machine. I start with the 3.5" squares, then sew the 4.5" squares without cutting in between each square. I cut the chain of the sewn 3.5" squares, bring them to the front of my machine, then sew the opposite sides.


Cut the squares apart.


Press the squares as they lay to set the seams. Using the side of your iron, press the t-o-t rectangular strips to the side of the print square.


Lay your block out again, so that you can see where to add your next strips(refer to graph paper diagram above).  As you can see, the pins you put in each corner and on one side of each 4.5" square make it easy to lay out your squares. 


Lay your 12-1.5" x 5.75" strips on top of the pins you placed earlier. Remove these pins carefully from the squares then pin your 5.75" long strips to the squares. You will notice that you have a bit of extra length in these strips. Do not stretch your square to fit, you will trim the excess away later. 


Pin your 2.5" squares to the outer corner of the corner squares. Stack and sew all 8 squares.


Bring your 4 bordered squares like the one above, to the ironing board. Press to set all seams, then use the side of your iron to press the t-o-t fabric towards the outside edges of the squares. 


Trim the flippy corners of your 4 corner squares, making sure that you trim just 1/4" to the right of the seam line. 

Press to set the seams, then use the side of your iron to press the t-o-t corners  and the 5.75" strips towards the outer edge of each print square.


Trim all 8 squares, making sure that they measure 5.5" x 5.5". I position my 6" x 6" ruler so that the 1.5" line rests on the inner edge of the t-o-t strip, as seen above. Double check that your block measures 5.5" x 5.5" and is square.


Carefully lay out your blocks and center square, so that they match the above graph paper diagram and the photo of the block at the start of this post.


Flip the three squares at the right over to the left, so that they are lying face-down on the squares on the center column. Pin down the right hand sides of each pair of squares, right-side-together. Stack then chain-sew each seam. Do not cut the threads that hold the three sewn squares together.


This is how your partially-finished block should look.


Do the same with the squares in the left column. Do not cut the threads that hold the three squares together.


Your block should now look like this.


Fold the top row over the middle row, right-sides-together. Pin well, especially at the seams, and sew, nesting the cross seams. Fold the bottom row up over the middle row, right-sides together. Pin well as before and sew.


The back of your block should look like this. Don't press yet!


You will see little thread loops from when you joined the squares in the four inner corners. Trim these off now.
Don't press yet!


Put your quilt block on your ironing board and use your long ruler to check to see if it measures 15.5" x 15.5" square. If your block is a little short in an area or two, first measure across the top and bottom edges to make sure they are at least 15.5" long, pinning your block corners to your ironing board. Then measure through the centers, using your pins to stretch-block your quilt block in the same way that you would block a freshly-washed wool sweater before it dries on a flat surface. 

Give your quilt block a spritz of water and let air dry for about 5-10 mins. Your quilt block should now measure 15.5" x 15.5" square. 


Now you can press your quilt block. As you can see above, I open up the four spots at the inner corners so they lay flat, and then press one seam in the up position and the seam following in the down position. This is called "pinwheeling your seam allowances". You will have less bulk and distortion at your crossed seams if you do it this way.


Your finished quilt block should look something like this. I did a BIG boo-boo…can you see it??? The fabrics in the Hourglass block are supposed to be: center print AND a print that is DIFFERENT form the rest of the block! Oh dear…in my defence, I was rushing to get this block done and the steps photographed as we were expecting rain the next day. 

I will have to un-pick the top and bottom rows, then take apart the middle row to substitute the correct center block, then sew it back up again. These are the kinds of things I do when we are watching Netflix at night. Bleck!


Oh, remember the 6.5" square of center fabric that we had to piece, at the end of Part 2? Well, this is it, and if you look very closely at the left corners of the center fabric, you will see the join, barely. It will be covered by the quilting and no one will ever know!!!

The next post of the Country Village QAL will be on May 27 for,
 Part 4: Adding Sashing Strips and Layout. 
This gives us 2 weeks to piece the 25 blocks needed for our Queen-sized quilt.

************

Sharing is caring!!! 
Don't forget that I am happy to share with your friends…feel free to pin to Pinterest, post on Google+ and Facebook, and Tweet away! Just please play fair and make sure your posts link back to this blog. *If you mouse/hover over the top right corner of my photos, a red "Pin-it" button will show up and all you have to do is click it to be taken to Pinterest. There is also another red button right beside it for posting to Facebook and Twitter. Or, you could always use the little square grey buttons at the end of this post. 

Thanks for reading and have a great day! 

Quilty Huggs, 

Jacqueline 

PLEASE NOTE: This blog accepts forms of compensation such as, but not limited to; fabric/notions/patterns/books in exchange for a posted review and/or tutorial. All comments/critiques/opinions are completely my own and are not those of the provider. This blog may also contain affiliate links and I will receive a small commission if you make a purchase after clicking on one of my links. Thanks so much!